

How To Add Columns In Mailchimp
Introduction
The "Content cake" of the "Boxed Text" offers different options to add content, for instance, links and images to your campaign. "Boxed Text" blocks can also exist used for wrapping the texted content around an image, setting various colors in the groundwork of your written content in every block of "Boxed Text," and more than.
Stride-past-Step Guide on How to add columns in MailChimp?
The post-obit procedures should exist followed to add columns in MailChimp email campaigns:
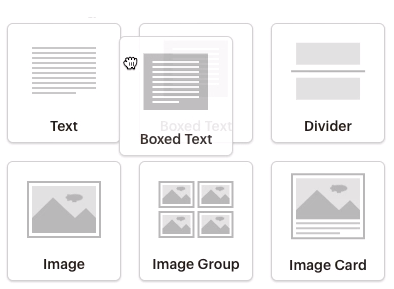
- For the same option of Manner but without any groundwork fashion options, become for a "Text" content block. Go to the "Boxed Text" block. To insert the "Boxed Text" content block into your layout, follow the steps described beneath:
- Click and bring in the "Boxed Text" block in your layout.
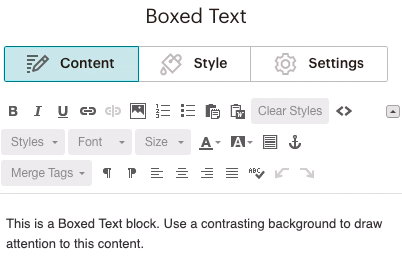
- In the "Content" tab, add the text you want to. If y'all're going to paste the content from whatever external source, for instance, a word processing program or a website, either enter the "Paste" similar plain text or employ a "Rich Text Editor" for pasting the content. You need to practise it to avoid the addition of some extra styling code.
- Make the necessary changes in the Settings tab and Style, or press Save and Close if y'all have finished the chore.
Edit Settings and Style
To edit the Settings and Style of the "Boxed Text" content block, you are required to follow the steps given below:
- Click on the "Boxed Text" block that yous are willing to go on with.
- In the "Style" tab, edit the Fashion of the content block. Y'all can edit the text alignment, line height, font weight, font style, font size, font family, text color, background color, and the box'due south border.
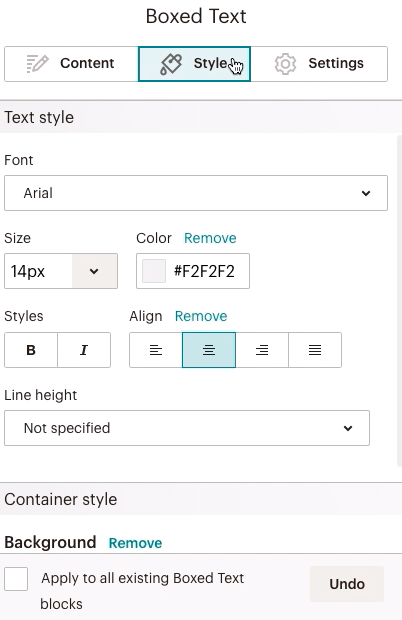
- To apply the Style, select each Boxed Text block in the layout and tick the next box, "Apply to all existing Boxed Text blocks."
- Please select whether you will use the columns and suit their size by the Cavalcade Split in the tab of Setting.
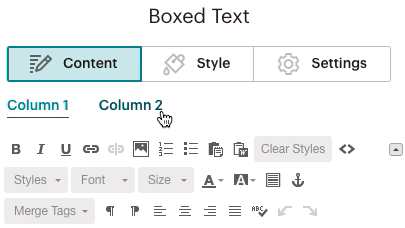
- Now go back again to the Content tab to apply any needed changes in Styling, or use the Styling to mere a few words in the content block, by using the toolbar present in the editing pane. If yous choose to select the Boxed Text cake for 2 columns, toggle between the 1st and second column tabs to edit and add content.
- Press Save and Close.
It should be considered that if the styles you ready don't alter the text in standard ways, remove the extra formatting from the tested content earlier going for the Styling.
Turn Dynamic Content On
When designing an email, you tin can add any content block to Dynamic content that is displayed only for specific recipients. This assists yous to target unlike kinds of contacts at a time with only one email.
When designing an email, you can turn any content cake into Dynamic Content that only displays individual recipients. This will help you target dissimilar types of contacts at the same time every bit a single email.
Other Ways of Using Boxed Text Cake
- Insert a picture and adjust information technology to the correct or left alignment to wrap the written context around an image.
- Make a layout that has iv columns in it. To practice this, in the Template pace, choose a 2 column layout, then add a Boxed Text block to every queue. Now, ready every cake to 2 columns in the Settings tab.
- Become for customized social icons in place of the default options already available in Share blocks and Social Follow. Upload your customized icons to the Boxed Text block and associate the pictures accordingly.
- Create a layout with unlike groundwork colors for every Boxed Text block. These groundwork colors are adjusted for each campaign layout, for instance, trunk, footer, and header.
Conclusion
The Boxed Text Content block allows you different options to add together content. This includes images, links, etc. This article shows yous everything you need to know if you want to add columns in MailChimp.
Source: https://www.emailtech.co/blog/how-to-add-columns-in-mailchimp
0 Response to "How To Add Columns In Mailchimp"
Post a Comment